Showing posts with label Cookies. Show all posts

Tuesday, April 24, 2018

Soft Maple Sugar Cookies

Soft Maple Sugar Cookies 

Sweet Community Rating:Not yet rated!
Prep time :0:15
Bake/Cook time :0:08 to 0:10
Yield :22 cookies
Chef :Jessica Segarra

Description

Maple is one of the most under-appreciated flavors, but not for long! These sweet and soft maple sugar cookies pack a double whammy with maple flavoring in the cookie as well as the icing - making them the perfect Fall dessert.

Ingredients

2 1/3 cups all-purpose flour* 
1/2 teaspoon baking soda 
1/2 teaspoon salt 
1/2 cup (1 stick) unsalted butter, softened 
1/3 cup vegetable oil 
1 1/2 cup Dixie Crystals Extra Fine Granulated Sugar
1 large egg 
2 teaspoons vanilla extract 
1/2 teaspoon maple extract 
2 cups Dixie Crystals Confectioners Powdered Sugar
2 tablespoons water 
1 teaspoon vanilla extract 
1/2 teaspoon maple extract 
Sprinkles

Directions

  1. Preheat oven to 350°F.  Line a baking sheet with parchment paper, set aside.
  2. In a medium bowl, whisk together flour, baking soda and salt.  Set aside.
  3. In a large bowl, beat butter, vegetable oil and sugar until well combined.   Mix in egg, vanilla extract and maple extract.
  4. Add flour mixture 1 cup at a time, mixing until completely combined.
  5. Roll 2 tablespoons of dough into balls and place on prepared baking sheet, leaving room for spreading. Lightly flatten dough balls with bottom of a cup into a disk shape.
  6. Bake for 8-10 minutes, just until edges are set.  Remove from oven and allow to cool for 15 minutes on baking pan.  Transfer to a cooling rack.
  7. For icing: In a small bowl, whisk together powdered sugar, water, vanilla extract and maple extract until smooth.
  8. Using a spoon, smooth icing onto top of each cookie. Quickly sprinkle with sprinkles if desired and let set for 10 minutes, or until hardened.
  9. Serve immediately or store in an airtight container for up to 5 days.

Wednesday, November 22, 2017

Soft Maple Sugar Cookies

This just may be our FAVORITE cookie recipe!

Soft Maple Sugar Cookies 

Sweet Community Rating:Not yet rated!
Prep time :0:15
Bake/Cook time :0:08 to 0:10
Yield :22 cookies
Chef :Jessica Segarra

Description

Maple is one of the most under-appreciated flavors, but not for long! These sweet and soft maple sugar cookies pack a double whammy with maple flavoring in the cookie as well as the icing - making them the perfect Fall dessert.

Ingredients

2 1/3 cups all-purpose flour* 
1/2 teaspoon baking soda 
1/2 teaspoon salt 
1/2 cup (1 stick) unsalted butter, softened 
1/3 cup vegetable oil 
1 1/2 cup Dixie Crystals Extra Fine Granulated Sugar
1 large egg 
2 teaspoons vanilla extract 
1/2 teaspoon maple extract 
2 cups Dixie Crystals Confectioners Powdered Sugar
2 tablespoons water 
1 teaspoon vanilla extract 
1/2 teaspoon maple extract 
Sprinkles

Directions

  1. Preheat oven to 350°F.  Line a baking sheet with parchment paper, set aside.
  2. In a medium bowl, whisk together flour, baking soda and salt.  Set aside.
  3. In a large bowl, beat butter, vegetable oil and sugar until well combined.   Mix in egg, vanilla extract and maple extract.
  4. Add flour mixture 1 cup at a time, mixing until completely combined.
  5. Roll 2 tablespoons of dough into balls and place on prepared baking sheet, leaving room for spreading. Lightly flatten dough balls with bottom of a cup into a disk shape.
  6. Bake for 8-10 minutes, just until edges are set.  Remove from oven and allow to cool for 15 minutes on baking pan.  Transfer to a cooling rack.
  7. For icing: In a small bowl, whisk together powdered sugar, water, vanilla extract and maple extract until smooth.
  8. Using a spoon, smooth icing onto top of each cookie. Quickly sprinkle with sprinkles if desired and let set for 10 minutes, or until hardened.
  9. Serve immediately or store in an airtight container for up to 5 days.

Tuesday, March 1, 2016

Bakery Style Chocolate Chip Cookies

BAKERY STYLE CHOCOLATE CHIP COOKIES

yield: 12-18 COOKIES
These Bakery Style Chocolate Chip Cookies are gooey, chocolatey, XL, and filled with brown butter!

INGREDIENTS:

  • 2 sticks butter (we’re going to brown it!)
  • 3/4 cup granulated sugar
  • 1 cup light brown sugar
  • 2 large eggs
  • 1 tablespoon pure vanilla extract
  • 1 teaspoon almond extract, optional
  • 1 teaspoon baking soda
  • 3 1/4 cups all-purpose flour
  • 1/4 teaspoon salt
  • 1 1/2 cup mini chocolate chips

DIRECTIONS:

  1. Melt butter in a saucepan over medium heat. Cook, stirring often, about 6 minutes, until it becomes brown in color. It will foam, reduce, then foam again. Once it’s done cooking the foam is a light brown and it will dissipate after you remove it from the heat. Once it starts to brown, keep stirring so it doesn’t burn. Let sit for about 5 minutes to cool. (Here is a visual on how to brown butter.)
  2. Pour into an electric mixer fitted with paddle attachment. While still hot, add both sugars and mix on low until combined. Let sit to cool for a few minutes.
  3. While butter mixture is cooling, combine flour, baking soda, and salt in a medium bowl. Stir and set aside.
  4. Turn mixer (with butter mixture bowl attached) on low. Add eggs, one at a time, mixing completely. Mix in vanilla extract and almond extract (optional, but it adds great flavor). Add flour mixture to the wet ingredients and mix until combined. Stir in chocolate chips.
    Important: Cover bowl with plastic wrap and chill dough for at least 3 hours. I chilled mine overnight. It must be COMPLETELY cold before you bake it for these to turn out properly.
  5. NOTE: to make it easier to scoop, let the dough chill for about 30 minutes so it's not too liquidy, then scoop your dough onto a cookie sheet lined with wax paper. Cover with plastic and chill for several hours or overnight, then place on baking sheets as in step 7 below.)
  6. Preheat oven to 350°. Line cookie sheets with parchment or silpat liners. If your dough has been chilling overnight, you may need to let it sit at room temp for about 20 minutes before you can scoop it. Even then, it’s gonna be an arm workout. It’s worth it!
  7. Scoop out 1/4 cup sized balls and place 6-8 on a sheet. They don’t spread a lot, but they’re BIG cookies.
    Bake for about 11-12 minutes. They will be golden on the outside and still doughy on the inside - perfect! Let cool for 5 minutes, and then remove from pans to cool completely.

NOTES:

Note: several readers have commented that the dough is "dry" when scooping. If you've measured your flour correctly (spoon/leveling, not packing) then the reason for this is because of the chilling. The dough isn't dry so much as crumbly. Spending overnight in the refrigerator makes the dough really hard and hard to scoop. It's an arm workout, but it's worth it. Squish the dough together as much as possible (or let it warm up a little on the counter before scooping) and they'll still turn out fine! The note in step 5 will reduce this issue!

Monday, February 16, 2015

Samoas Cookie Pie


Samoas Cookie Pie
Photo/Recipe - Averie Cooks

The textures and flavors of classic Girl Scout Samoas Cookies are all there in this giant cookie. Gooey, chewy, sticky, sweet, and wonderful. It may even be better than the real thing. It’s a fast, easy, no-mixer recipe that comes together in minutes and there’s nothing fussy about it. There's a simple stir-together dough for the crust before topping with chocolate chips, shredded coconut, sweetened condensed milk, salted caramel, and a final chocolate drizzle. You can use homemade salted caramel or your favorite storebought. I like salted caramel because the slight saltiness cuts through some of the sweetness but regular caramel sauce is fine. The cookie base is soft, chewy, dense, and the perfect support system for the chocolate, coconut, and salted caramel that gets piled on. With this recipe, it's Girl Scout cookie season year-round. Dangerous.
YIELD: one 9-inch pie, serves 8 to 16
 
PREP TIME: 10 minutes
COOK TIME: about 35 to 37 minutes, divided
TOTAL TIME: about 4+ hours (or overnight), for cooling

INGREDIENTS:

1/2 cup unsalted butter (1 stick), melted
1 large egg
1/2 cup light brown sugar, packed
1 teaspoon vanilla extract
1 1/4 cups all-purpose flour
1/4 teaspoon salt, or to taste
3/4 cup semi-sweet chocolate chips, for sprinkling
1 1/2 cups sweetened shredded coconut, loosely laid in measuring cup (not packed)
two-thirds of one 14-ounce can sweetened condensed milk (about 10 ounces)
4 to 5 ounces salted caramel sauce (use homemade salted caramel or storebought, regular caramel sauce may be substituted)
3/4 cup semi-sweet chocolate chips, melted for drizzling

DIRECTIONS:

  1. Preheat oven to 350F. Spray a 9-inch pie dish very well with cooking spray; set aside.
  2. In a large, microwave-safe bowl melt the butter, about 1 minute on high power.
  3. Wait momentarily before adding the egg so you don't scramble it. Add the egg, brown sugar, vanilla, and whisk until smooth.
  4. Add the flour, salt, and stir until just combined; don't overmix.
  5. Turn batter out into prepared pie dish, smoothing the top lightly with a spatula. Bake for about 10 to 12 minutes or until edges firm up slightly and center will have begun to set up a bit. It's by no means done, but pie will be returned to oven to bake another 25 minutes or so.
  6. Remove pie dish from oven, and evenly sprinkle 3/4 cup chocolate chips over the crust.
  7. Evenly sprinkle the coconut.
  8. Evenly drizzle the sweetened condensed milk (just eyeball it).
  9. Evenly drizzle the caramel sauce (just eyeball it).
  10. Return pan to oven and bake for about 25 minutes, or until there's slightly bubbling near the edge of dish and the center has dried out some and looks more set. Cookie pie will firm up more as it cools. In the last 10 minutes of baking, watch it like a hawk because the coconut, caramel, and sweetened condensed milk will all be prone to burning; better to underbake than overbake if you're unsure.
  11. Allow pie to cool in dish on a wire rack while you melt the chocolate for drizzling by adding 3/4 cup chocolate chips to a small microwave-safe bowl and heat to melt, about 1 minute on high power. Stop to check and stir and heat in 10-second increments until chocolate can be stirred smooth.
  12. Using a spoon (or pastry bag or ziptop bag with corner cut off if you want to be fancier but I didn't bother), evenly drizzle the chocolate in long vertical lines, parallel to each other, spaced about 1/2-inch apart. Pie doesn't have to be cooled to add the chocolate drizzle.
  13. Allow pie to continue to cool on wire rack for at least 4 hours (or overnight) before slicing and serving. Don't slice too early because chocolate drizzle needs to set and interior of pie needs to firm up or you'll have a literal hot mess. Pie is best fresh, but will keep airtight at room temperature for up to 5 days, or in the freezer for up to 6 months. I store it by slicing into small wedges, wrapping each wedge individually in plasticwrap, and putting those in a large ziptop bag.

Sunday, December 9, 2012

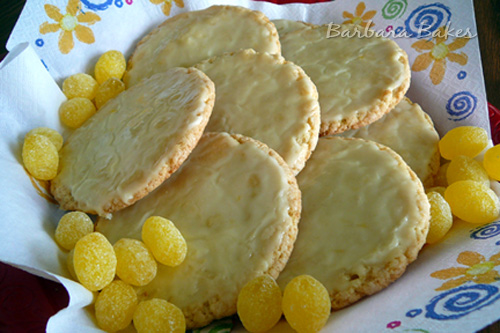
Over the Top Lemon Drop Candy Cookies


By far the BEST cookie out there.  There is a store by my work called Over the Top Cookies and their lemon is simply amazing.  I had to do a search for a copycat and this did not disappoint!  It's definitely a new favorite around our home.  The original recipe says bake 10-12 minutes, but that was way too long.  I baked for about 8-9 for a nice chewy cookie.  ENJOY!

Over the Top Lemon Drop Candy Cookies

3 cups flour
1 teaspoon baking soda
1/2 teaspoon salt
1 cup unsalted butter
1 tablespoon finely grated lemon zest
1 1/3 cups sugar
2 large eggs
1 teaspoon vanilla
1/2 teaspoon lemon extract
1 (4 ounce) package lemon drop candies, crushed

Glaze
1 1/2 cup powdered sugar
3 tablespoons lemon juice

Preheat oven to 350 degrees.  Mix flour, baking soda and salt; set aside.

Put sugar and lemon zest in the bowl of an electric mixer.  Mix on medium speed 30 seconds.  Add butter; mix until pale and fluffy, about 1 minute.  Mix in eggs one at a time; add vanilla and lemon extract.  Gradually add flour mixture, and mix until just combined.  Stir in crushed lemon drop candies.

Roll into 1-inch balls, flatten slightly and bake on parchment-lined baking sheet for 8-9 minutes until edges start to brown and center is almost set.  Let cool slightly on pan 1-2 minutes transfer cookies to cooling racks; let cool completely. (I put glaze on after I transferred.  It flowed over the whole cookie easier).

Make glaze by mixing powdered sugar with lemon juice; then spread over cookie tops.

Tuesday, February 14, 2012

Red Velvet Crinkle Cookies


Red Velvet Crinkle Cookies

Yield: 2 dozen heart shaped cookies

Prep Time: 5 minutes

Cook Time: 10 minutes


two peas & their pod

Red Velvet Crinkle Cookies cut into heart shapes for Valentine's Day.

ingredients:

1 box red velvet cake mix (I used Duncan Hines)
2 tablespoons all-purpose flour
2 large eggs
1/2 cup canola oil
1 teaspoon vanilla extract
Powdered sugar, for rolling the cookies
Heart shaped cookie cutter, optional

directions:

1. Preheat oven to 350 degrees F. Line a large baking sheet with parchment paper or a Silpat and set aside.

2. In a large bowl, combine cake mix and flour. Whisk until clumps disappear. In the bowl of a stand mixer, mix together cake mix, flour, eggs, oil and vanilla extract. Mix until smooth. Take about 1 tablespoon of cookie dough and form into a ball. Roll the ball in powdered sugar until fully coated. Place cookie dough balls on prepared baking sheet. Bake for 10 minutes, or until edges are set and cookies begin to crack.

3. Let cookies sit on baking sheet for 2 minutes. If desired, cut cookies into heart shapes, using a heart shaped cookie cutter. Transfer cookies to a wire cooling rack and cool completely. Eat the cookie scraps:)

Note-you don't have to cut the cookies into heart shapes. They are great round too!

Friday, November 11, 2011

Lofthouse Style Frosted Sugar Cookies

I've had a favorite sugar cookie recipe for a while now, but I believe that the secret ingredient in sugar cookies is the sour cream. I can almost guarantee that anything made with sour cream is delicious. It makes the cookies so moist. Who actually likes hard crunchy cookies? Not me! As I was searching on pinterest I came across these and they looked divine so I had to try them. Turns out they're just as good as they look. Now I just need to find someone to take some to. I should have halved the recipe. It makes about 4 dozen! Enjoy :)

Lofthouse Style Frosted Sugar Cookies

Cookies:

6 cups flour, divided
1 t. baking soda
1 t. baking powder
1 c. butter, at room temperature
2 c. granulated sugar
3 eggs
2 t. vanilla extract
1 1/2 c. sour cream

Frosting:

1 c. butter, room temperature
1 t. vanilla extract
4 c. powdered sugar
6 T. heavy cream
Several drops food coloring
Multi-colored Sprinkles

Directions:

In the bowl of a stand mixer with the flat beater attached, cream the butter and granulated sugar at medium speed until light and fluffy, about 3 minutes. Scrape down the sides of the bowl with a rubber spatula as needed. Add the eggs, one at a time beating until each is incorporated. Add the vanilla and sour cream and beat at low speed until combined.

Add the dry ingredients and beat at low speed until just combined, scraping down the bowl as needed. Dough will be a bit “sticky”. Divide dough into two sections. Flatten into rectangles about 1 1/2 inches thick, then wrap with plastic wrap. Chill in the refrigerator overnight or at least two hours until firm.

Preheat the oven to 425 degrees. Line 2 large baking sheets with parchment paper or spray them with nonstick cooking spray, set aside.

Use the plastic wrap that you chilled the dough in. Dust the top of the dough and then flip and flour the other side, keeping it on the plastic wrap. With a rolling pin, roll the dough out to 1/4-inch thickness. Using a 2 1/2-inch round cookie cutter, cut out circles and transfer to a baking sheet. Bake for 7 minutes, until pale golden. Immediately transfer cookies to a wire rack to cool.

To make the frosting, in the bowl of a stand mixer fitted with the paddle attachment, cream together the butter and vanilla. Slowly beat in the powdered sugar. Once smooth and creamy, add in heavy cream, 1 tablespoon at a time until the desired spreading consistency is achieved. If desired, add food coloring and beat until combined.

Once cookies have cooled completely, frost and add sprinkles. Allow frosting to set, then store in an air-tight container. Let cookies sit for several hours before serving to allow the flavors to develop.

Makes: 4 1/2 dozen cookies

Saturday, August 20, 2011

Single Serving of Ready to Eat Cookie Dough


So I actually came across this on pinterest and HAD to try it. I've been working hard and studying for boards and I needed a little something sweet in me. This recipe is actually probably two servings... so I would either half this or make sure you have someone else to share with. I also didn't add the chocolate chips because I hate biting into the hard chips in cookie dough. Some people like it though.


READY TO EAT CHOCOLATE CHIP COOKIE DOUGH

Ingredients:
3 Tbsp Butter
4 Tbsp Sugar
6 Tbsp Flour
Splash of Vanilla
1-2 Tbsp of Milk
As many chocolate chips as you want


In a small bowl, mash up the butter. You want the butter barely soft enough to break apart easily. You don't want it melted. Add everything but the milk and chocolate chips. It will be tough but don't give up! When complete, you should have a dry crummy mess.

Once you have incorporated the ingredients as best you can, add as much milk (you could use water too) as you need ntil you get desired cookie dough texture.

ENJOY! :)


Thursday, August 18, 2011

Best No-Bake Cookies

BEST NO-BAKE COOKIES


Prep Time: 15 minutes
Cook Time: 5 mintes
Yield: 24 cookies

Ingredients:
2 cups sugar
1/2 cup milk
1/2 cp cocoa
pinch salt
1/2 cup butter
1 cup peanut butter
1 tsp. vanilla
3 cups oats


Preparation:
In large saucepan, combine sugar, milk, cocoa, salt and butter - mix well. Bring to a boil and cover saucepan for 30 seconds to allow steam to wash sugar crystals down sides of pan. Stir mixture and bring it to a boil that can't be stirred down for 1 minute. Remove from heat and stir in peanut butter and vanilla until smooth. Add oats and mix well.

Drop mixture by spoonfuls onto waxed paper or aluminum foil. Let cool until you can touch the mixture. Let cool completely - or don't! They're delicious when they're hot and not hardened. Store tightly covered at room temp. You can also pour this into a 9" square pan that has been greased with unsalted butter, let cool and cut into squares.

Thursday, July 21, 2011

Giant Rainbow Cookies


Giant Rainbow Cookies
How Sweet it is

makes 18 large or 36 small cookies

2 cups + 2 tablespoons all-purpose flour

1/2 teaspoons baking soda

1 1/2 sticks (12 tablespoons) of salted butter, melted and cooled

1 cup brown sugar

1/2 cup sugar

1 egg + 1 egg yolk, at room temperature

2 teaspoons vanilla extract

1 cup mini m&m’s (or something else that you love)

Preheat oven to 325 degrees F.

Mix the flour and baking soda in a bowl and set aside. In another bowl, mix the butter and sugars until they are combined (and look like the first picture above). Add the egg, egg yolk, and vanilla and stir until mixed. Gradually add flour and mix until a dough forms – it will look crumbly at first, but it will come together. I even used my hands to help at one point. Fold in the m&m’s.

Divide the dough how you choose (1/4 cup portions for 18 large cookies or 2 tablespoon portions for 36 smaller cookies). Shape each portion into a ball with your hands then pull each ball into two equal pieces. Turn each half so that the rough side of the half (what used to be the inside of the ball) faces upwards and then squish both halves together. Place the dough rough-side up on a baking sheets. If you’re doing large cookies, I’d leave about 2 inches in between each.

Bake for 12-15 minutes (large cookies) or 8-12 minutes (small cookies) or until the edges are slightly brown. The centers should be
soft and puffy. Do not over bake. Let cool completely then dig in!

Note: to melt the butter I simply microwaved it, and to let it cool I allowed it to sit for about 10 minutes.

Wednesday, June 8, 2011

Chocolate Fudge Peanut Butter Cookie Stuffed Cookies


Chocolate Fudge Peanut Butter Cookie Stuffed Cookies

Mmm. Try saying that three times fast. This is my first stuffed cookie that I've ever tried and boy was it a surprise! I found a blog that is LOADED with all sorts of stuffed cookies. I have yet to try a cookie because I have to earn it... After my workout tomorrow! BUT my husband says they're delicious! So give it a try!!

Recipe pulled from: Picky Palate


Chocolate Fudge Peanut Butter Cookie Stuffed Cookies

Peanut Butter Centers
1 cup creamy peanut butter
1/2 cup granulated sugar
1 egg

--------------------------------
2 sticks softened butter
1 cup granulated sugar
2 large eggs
1 Tbsp pure vanilla extract
1 3/4 cups all purpose flour
1 tsp baking sode
1/2 tsp kosher salt
1 1/2 cups chocolate chips
1 cup cocoa powder

1. Preheat oven to 350 degrees F and line a large baking sheet with parchment paper or a silpat liner.

2. Place peanut butter and sugar into a medium bowl, mix to combine then add egg, mixing until well combined. Set aside.

3. In a stand or electric mixer, beat butter and sugars until well combined. Add eggs and vanilla, beating until well combined.

4. Place flour, baking soda, and salt into a large bowl. Add to wet ingredients along with cocoa powder and chocolate chips, slowly mixing until just combined. With a medium cookie scoop, scoop two scoops of the chocolate dough and one small scoop of the peanut butter dough. Smash together and place about 1 inch apart from each other. Bake for 13-15 minutes, until cooked though. Let cool on baking sheet for 5 minutes before transferring to a cooling rack.


Sunday, March 27, 2011

Oreo Cheesecake Cookies


Oreo Cheesecake Cookies
-Brown Eyed Baker

Yield: About 1 dozen cookies

Prep Time: 20 minutes | Bake Time: 12 to 15 minutes

½ cup unsalted butter, at room temperature
3 ounces cream cheese, at room temperature
1 cup granulated sugar
1 teaspoon vanilla extract
1 cup all-purpose flour
½ cup mini chocolate chips
1 cup Oreo cookie crumbs

1. Preheat oven to 375 degrees F. Line a baking sheet with parchment paper and set aside.

2. In a mixing bowl, cream together the butter and cream cheese on medium speed until smooth and well-combined.

3. Add the sugar and vanilla extract and mix until the ingredients are well-combined. Add the flour and mix on low until the flour is incorporated. Stir in the mini chocolate chips with a rubber spatula.

4. Place the Oreo cookie crumbs in a small bowl. Scoop the cookies into about 1½ to 2″ balls and then roll in the cookie crumbs. Place the cookie balls on the baking sheet. Bake for 12 to 15 minutes, or until the edges are golden and the tops are slightly puffed.

5. Cool on the pan for 2 minutes before transferring to a wire rack to cool completely. Store in an airtight container.

Friday, March 18, 2011

Super Soft Sugar Cookies/Butter Cream Frosting


I recently made these for an orthodontic office that allowed two of my classmates and I to do a research project there. So, we decided to make them a little treat to thank them. Aren't these cookies adorable!? Okay so maybe I'm a little TOO into my profession, but I think they're to die for. While frosting them at school we had some extra and I had a request to put this recipe up. They are honestly the softest and best sugar cookies I have ever had. You know whenever you have a homemade sugar cookie and it's rock hard? Well, NOT these ones!
PS- Since I'm kinda on the subject of dentistry I just want to throw it out there that a hygienist and an assistant is NOT the same thing. I had an old friend ask me the other day why I was doing something so worthless and something that didn't pay more than $10 an hour. I explained to this person the difference and he/she now understands that it is a much better job than an assistant. The hygienist cleans... and does much more in the office than an assistant is even allowed to do. Okay sorry for my mini rant... Here is the recipe!

Super Soft Sugar Cookies

1/2 cup butter, softened
1 cup sugar
1 egg
1/2 cup sour cream
1 tsp vanilla

Cream the above ingredients. Add the following:

3 - 4 cups flour
1 tsp. soda
1/2 tsp salt

Bake at 350 for 5-10 minutes on parchment paper or lightly greased pan.


Butter Cream Frosting
1/3 cup softened butter
3 1/2 cups powdered sugar
2 tsp vanilla
1/4 cup milk

Mix all ingredients and add food coloring if desired. The key to this is not softening/melting the butter too much. Otherwise your frosting will come out way too runny. Yeah I learned that the hard way.


ENJOY! :) You'll never go back to any other sugar cookie recipe after this one!

Friday, March 4, 2011

Mom's BEST Chocolate Chip Cookies Ever!

Mom's BEST Chocolate Chip Cookies Ever!

1¼ cup butter
¾ cup sugar
¾ cup brown sugar
1 tsp. vanilla
2 eggs
1 tsp. salt
1 tsp. soda
3 cups flour
1 12 oz pkg chocolate chips

Preheat oven to 350-375°. Cream butter/sugars/vanilla/eggs. Add flour/salt/soda. Stir in chocolate chips. Bake for about 7-8 minutes. DON’T OVER COOK -- you’ll need to experiment with your oven temp and the time to bake the cookies to know exactly what is best with your oven. You'll want to take them out when they still look a tiny bit doughy so that they end up soft and chewy.
Related Posts Plugin for WordPress, Blogger...